
“Cute, easy to use and with lots of activities to work with, for about $100 the mBot definitely punches above its weight. Learn to program it in Scratch-code or C/C++ and you’ll soon have a little robot pal that will delight your kids and teach them a thing or two at the same time. If you need more out of it you can even add on extra modules for an extra cost.“
What We Like
What We Don’t Like
Technical Specs
| Size | About 6.69 x 5.11 x 3.54 inches (17 x 13 x 9 cm) |
| Weight | 14.1 oz or 400 g |
| Supported Coding Languages | Block coding and Arduino C |
| Battery | 4 AA batteries or lithium (sold separately) |
| Features | a light sensor, IR receiver, Ultrasonic sensors and a line following sensor, more available but sold separately |
| Compatible with | Windows, Mac, Linux, Chromebook, iOS , Android |
| Age | Company Says: 8+ We think: best for 10+ |
In 2016, the Makeblock team put together a kickstarter to raise funds and build a programmable robot for kids. Their idea was simple- kids love robots and building/programming robots can teach kids a lot of concepts in STEM.
A robot that was easy to use and affordable seemed like a perfect idea. Their backers seemed to think so as well, and after quickly raising the money required, the company began making the mBot – a small, friendly looking robot that kids could easily build and learn to program.
What is the mBot, anyway?
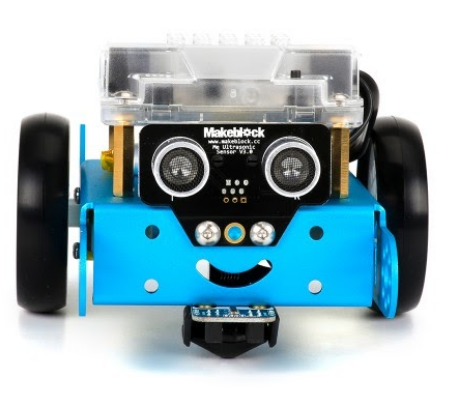
The mBot is, as we stated above, an easy to use programmable little robot that your kids can build from a kit and then program to do all sorts of projects and activities. Because it is a kit robot, its looks are decidedly homebuilt, rather than being more futuristic and polished like some other pre-assembled robots out there.
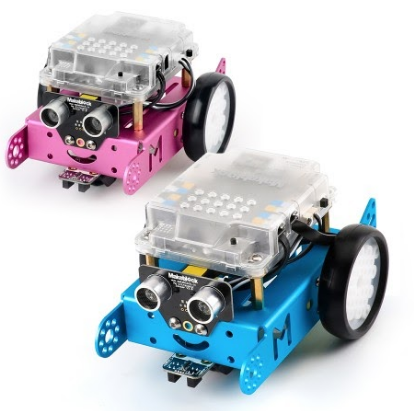
Despite (or perhaps because of) this, with its bright blue and pink colors, front-mounted ultrasonic scanner “eyes” and a little smile cut into the front of the robot chassis, the mBot has a friendly look that we think kids will find non-intimidating and, yes, even a little charming.
What features does it have?
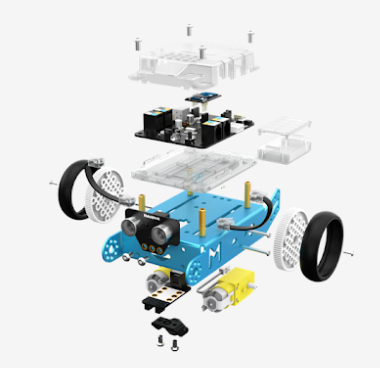
The mBot is, at its core, a fully programmable robot for kids. The mBot is centered around an Arduino circuit board, a popular open source electronics platform, and its pretty much blank slate for your kids to work with.
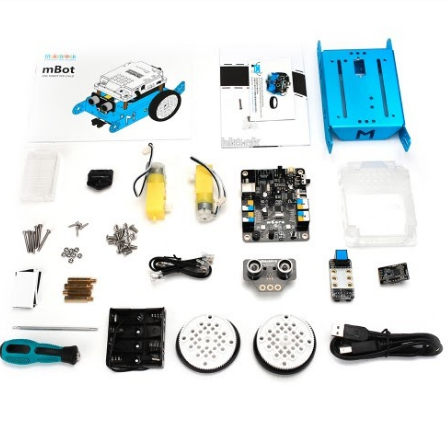
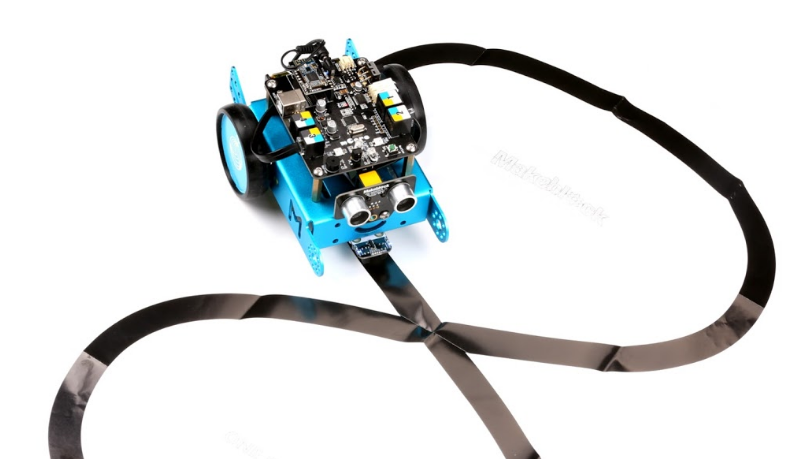
Out of the box, mBot comes with a few sensor modules built in – a light sensor, IR receiver, Ultrasonic sensors and a line following sensor. That means from the get go your kids can create a number of programs around collision detection, object avoidance and line following or they can play around with it using an included infrared remote control.
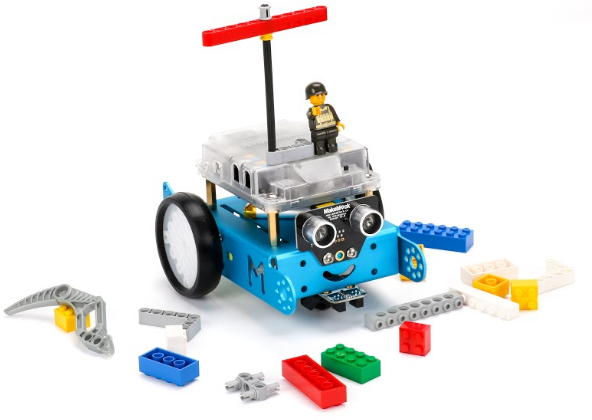
One thing that we thought was a nice touch was that parts of the robot are lego-compatible, so you can integrate lego parts to your projects or just take your little lego guys for a ride.
The mBot also, strangely and adorably, can play musical notes.
One thing we found interesting is that the mBot, unusually for these types of robots, comes with four expansion slots, meaning it is an educational platform that you can add on to and modify.
Makeblock sells these add-on module packages separately, typically for $18-25 each, letting you upgrade and expand (for a price) the mBot’s capabilities in order to tackle more sophisticated projects as your kids develop their robotics skills.
A few examples of these add-ons include:
- Penguin kit – lets it dance and tell jokes, shake hands, act like a Happy Feet penguin really
- Six legged Robot – replaces the wheels of the robot with “legs” and helps kids learn different kinds of robotic locomotion, from frog to insectoid.
- Servo kit – gives the robot more range of motion, from moving “hands” to light emitting diodes you can program to wave
- Perception sensors – add a variety of sensors to help the robot detect and perceive its environment, such as humidity sensors, temperature sensors, range finder, light and sound sensors and more
Controls
There are a few ways you can control the mBot and make it do your bidding.
There is an included remote control (cr2025 coin battery also not included) that works with the robot’s infrared sensors to give you basic control over the robot and make it play a few cute notes.
If you’d rather use a tablet or phone you can using the Makeblock app. It turns your mobile device into a touchscreen controller that communicates with the robot via Bluetooth (newer mBot robots) and lets you physically draw paths for mBot to follow, which is cool.
Generally speaking, how well the mBot will drive around really depends on how much care you’ve put into making sure it’s assembled correctly. We found it to be relatively smooth and quick.
Batteries
By default. the mBot takes 4 AA batteries, which isn’t all that uncommon for these types of homebuilt robots. While they’re not too hard to find when you need to buy them, they will run down and have to be replaced.
When you do have to replace them you will run into one of the mBot’s more notable downsides – the battery pack is located under the Arduino control board, so you’ll have to do some unscrewing to access it – which can be inconvenient and annoying.
Makeblock does have a rechargeable lithium battery back that you can use instead that will last longer and be rechargeable, however this is, again, an add-on you’ll have to buy seperately.
Price
You can generally buy an mBot robot for about $69.99. This makes it quite affordable for a robot kit, as they generally tend to cost around $100 or more.
Ages:
Makeblock says the mBot is appropriate for kids ages 8 and up.
We say it really depends on your kids technical abilities and comfort with electronics and mechanical devices, but we think kids over 10 shouldn’t have much of an issue.
The reason for this is assembly does require some care, and while the frame is relatively strong there are smaller plastic bits that can get damaged so kids need to learn to play a little more gently than they would like despite being excited about having a robot.
How easy is the mBot to build?
To the delight of many young, would-be engineers you do get to (have to) assemble the mBot yourself.
Overall, we didn’t find the mBot too difficult to put together. The included manual is clear and straightforward, using lots of clear illustrations and step by step instructions, and reminded us a little bit of Ikea instructions. The kit comes with its own screwdriver and there’s no soldering or really any complex electronics work involved.
That said, assembling the mBot involves some screwing together, fitting things and all kinds of fiddling around. It’s not at all hard but does have modules that can get damaged accidentally and screws that can get lost. So really, you want some parental supervision on this one.
Overall, it took us about forty-five minutes to assemble the mBot, including time spent making sure we were all doing things in a step by step manner.
If you’re nervous about following an instruction manual (or just prefer 21st century tech solutions) you can download the app instead. It actually has some really cool 3d step by step instruction guides that make assembling the robot even easier.
How durable is the little fella?
The mBot frame is built out of 2mm thick aluminum making it quite lightweight yet still sturdy enough to survive mild-to-moderate kid-handling. That said, while the frame is somewhat durable, it does have small motors, servos or modules that can and will break if you handle it too roughly.
Past customers report having issues with small screws coming loose, pieces not fitting snugly and impeding its drivability – how much is the robot and how much is due to assembly errors on their part is unclear. Our own experience is that things fit pretty snugly and felt like they would last for some time.
Bottom line: while accidentally dropping it from a small height shouldn’t do too much damage, we wouldn’t launch it off ramps or enter it into any robot fighting competitions anytime soon.
Programming the mBot
The mBot supports two types of programming.
The first is a Scratch-based block coding program called mBlock. If you’re not familiar with block coding, it allows kids to basically code by point and clicking little squares of code, assembling a list of commands that the robot will follow step by step.
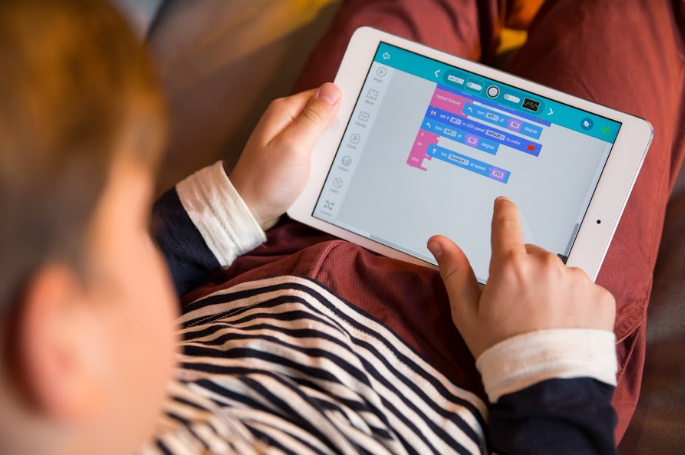
With mBlock, kids can learn the basics of programming logic without fear of getting syntax wrong or making small errors in typing that can frustrate their learning.
As they get more experience and/or develop an interest in coding, they can learn to program mBot in Arduino C, which is not only a more widely used “real” programming language, but gives them far better control over the robots hardware and can be used for very sophisticated projects.
We really like that mBot supports both Scratch-based block coding and Arduino C. This allows the robot to “grow” with your kids skill development – as they progress in coding ability and interest, they can change up the programming language they use to do more sophisticated projects.
Uploading your code
Like other educational robots, you can upload your code by connecting the mBot to your computer via USB cable, an old school but probably the most reliable method.
Will kids learn anything?
While it is a pretty cool robot, the whole point here is to have your kids learn a thing or two about science, technology, engineering and math while they’re messing around with their new pal.
In addition to the skills they’ll learn assembling the robot, the mBot’s various projects and activities are all centered around real life concepts in robotics that your kids will learn about, such as collision detection, machine perception, object avoidance, line following and more.
Makeblock includes a variety of tutorial material and videos that you can work with for free on its website. The educational material provided is pretty much everything you need to get started with the mBot, explaining how to get things going before diving a little bit into how things work.
They are focused more on explaining, step by step, how to get things working for a variety of projects rather than going into detail about the science behind the various modules and sensors, although these are covered to some degree. While the lessons are very good teaching what the purpose of each activity is and how to get started, if you want more in-depth background explanations of the electronics and robotics we think you’ll need to supplement it with other material.
That said, the mBot is highly popular online and there are any number of enthusiasts and resources out there that not only have created lesson plans around it, but have custom projects you can find, upload and try yourself.
Conclusion
Cute, easy to use and with lots of activities to work with, for about $100 the mBot definitely punches above its weight. Learn to program it in Scratch-code or C/C++ and you’ll soon have a little robot pal that will delight your kids and teach them a thing or two at the same time. If you need more out of it, you can even add on extra modules…for a price.
FAQ

About the Author
David Belenky is a freelance writer, former science and math tutor and a tech enthusiast. When he’s not writing about educational tech, he likes to chill out with his family and dog at home.